| Home | Contents | Start | Prev | 1 | 2 | 3 | 4 | 5 | 6 | 7 | 8 | 9 | Next |
Battery Voltage Monitoring and Charging
NiMH cells can be considered 'flat' when their terminal voltage drops to 1.0v or less. Therefore, when the battery pack voltage drops to 12v (from 14.4v nominal), the power to the cutting motor and drive motors will be cut. The mower will stay in this state until it is recharged.
The on-off switch will double as a charge/run switch. When 'off', current from the charging socket will be routed to the batteries. When 'on', the charge socket will be disconnected and battery voltage will be applied to the mower.
There are few chargers available that will fast charge 12 AA batteries at once and although to build one would not be onerous, my thoughts strayed to power tools. Many power drills have 14.4v battery packs, and come with a fast charger suitable for NiMH or NiCd batteries. I'll see about modifying such a charger or perhaps build one of my own. This also simplifies the lawnmowers charge circuitry, it reduces to a socket and a SPDT switch.
Painting
Painting is naturally the most important part of the whole process and I sat down on the grass with my two girls and let them go mad. It was a messy business but we all had a good time. Each surface had to be a different colour which certainly made painting a tricky business. However, the tupperware lid did not take paint too well and when it dried, some of it flaked off. So we tried again with different paint.
The Eyes
Now was the time to tidy-up, make the eyes. An extra touch-switch (or two) needs wiring in parallel to the centre bump switch and this would be triggered by the eye-stalks hitting an overhanging obstruction. This is needed to prevent the mower diving under a bush and getting stuck on the overhanging branches.
The eye stalks needed to be flexible, springy and capable of making an electrical circuit when they hit something. I considered using feelers that were attached to microswitches but felt they needed to be more robust than this. Eventually, I decided to use net-curtain-rods. There are actually a steel tightly wound spring that is covered in a plastic sheath. Although the steel may corrode over time, they would be easy to replace. The idea is shown in the diagram and I set about making them. The eyes themselves would be ping-pong balls or polystyrene balls, whichever I could get my hands on. The good thing about using the curtain rods is that as they are hollow, it should be possible to run wires down the middle so that LEDs could be mounted in the eyeballs. This is not really relevant for this project but is worth considering for other designs that do not work in full daylight.
Construction was pretty straightforward. I used parts from a propelling colouring pencil as the base and washers as the second contact. Wires were soldered in place and everything glued together. We shall see how well the glue holds together. On a wet Sunday afternoon, Joules (5) painted the eyeballs with a little help grom me to hold them. We had lots of fun and we are just waiting now for the eyelashes as the mower is going to be a girl :-).

Test Runs
Here are some videos of the testing done during the build process.
| Basic mowing test | |
| Bump sensor testing |
Modifications to the Cutting Motor
The mower is running off 12 x 2900 mAH batteries. This is giving 40 mins runtime, less if the grass is longer. This is not the two hours I was expecting. I notice that when power is low, the locomotion suffers more than the cutting. When I check the batteries once drained, they are very hot so I think I may be overtaxing them. I decided to measure current while mowing and with the blade running, there is a constant drain of 2A, more than my design goal of 1.5. This spikes much higher if Lawna hits a longer patch of grass. Although rated at 2900 mAH I am in fact getting something like 30mins x 2000 = 1000 mAH from the batteries. I could have a faulty cell or the large spikes could be causing the poor performance.
It would be possible to tinker with batteries but I decided to try and reduce the current drain as this is the root cause. The main power hog is the cutting blade. This has a rotational speed of 13000 rpm with a torque of 154 g/cm. It is a powerful 21 watt motor and works well, but at a price.
I originally approached mowing with the idea of having a very fast blade to allow a blunt blade to cut the grass. I decided to rethink this. If I used a slower rotational speed, by the use of gearing, it could be possible to achieve the same torque but using a less power hungry motor. I did source a motor that gave about the same torque which ran at 5000 rpm via gearing. I decided to go one step further and bring the rpms down lower and increase the torque further. This would enable me to increase the blade size slightly and get a larger cutting area.
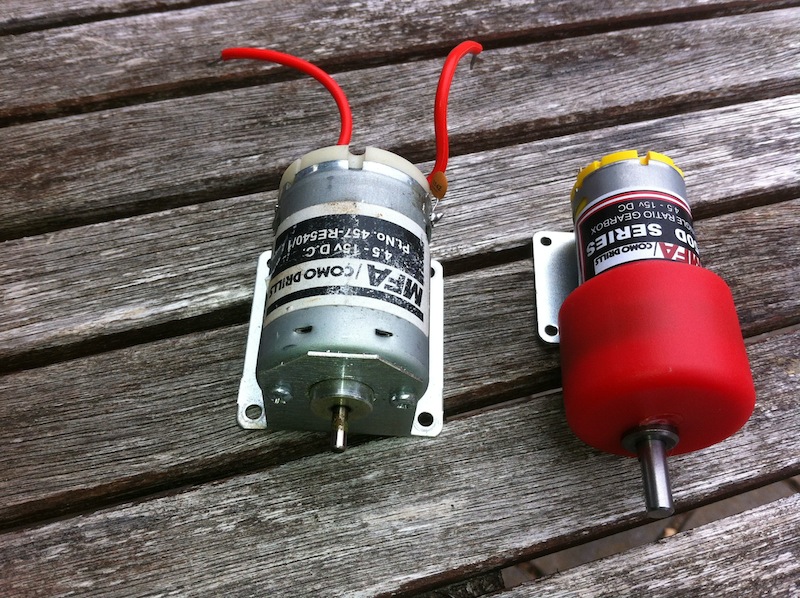
The motor I chose is a 6 Watt device with a 6:1 gearbox which gives it a torque of 392 g/cm, over twice that of the previous motor and initial testing indicates the total mower current consumption drops to 1 amp from 2 amps using this setup, hopefully which should double my battery life. The 2100 rpm rotation is considerably lower but I did some mowing testing and it looks to work as well as the faster blade, and with more torque. The picture below shows the original 21 Watt motor next to the 6 Watt motor with its red gearbox housing.
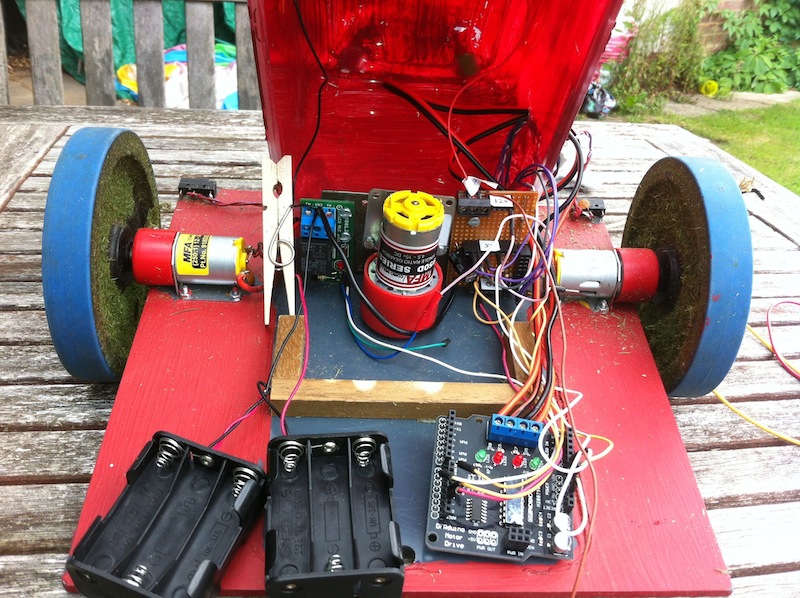
Changing the motor was not too onerous although it did involve a lot of dismantling. Here you can see the fatter gearbox just fits in the space provided and a few changes were needed to the mounting, but these could all be accommodated with the existing brackets. A new blade was manufactured which is 2cm longer than the original. I can make the blade larger but I need to ever mindful of little fingers and with the extra torque this setup has, it could do some serious damage so I've mounted it so it will slip on the shaft if it hits something too solid! The lower speed of rotation does make the mower sound better on the ear as the high pitched whine from the cutter is replaced by a lower frequency drone.
Blades Revisited (again)
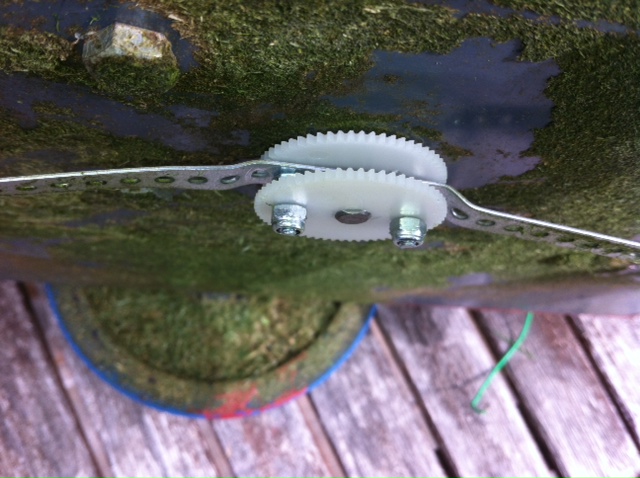
The mounting arrangement for the blades is now somewhat different. I used two two disks to hold the blade to give more friction. These need to be drilled with some precision to allow correct alignment. It would be simpler to make the outside disk mounting hole D-shaped like the gearbox shaft but I still wanted some degree of clutching in case the blade hits little fingers.
Rewiring
While I was pulling bits out of the mower, I decided to make some of the wiring more permanent. The arduino is great for prototyping but the round-pin-in-a-square-hole does not make for a reliable and long lasting connection. So far, I have not really had any problems but the vibrations of the mower lend themselves to wires working loose.
A simple solution to the firm-up the wiring was to plug male pcb headers into the female sockets and then makeup female header blocks. These could use square connectors which would make the joints far more secure. In addition, the use of rows of connectors make the connections much more secure, rather than having one wire per socket
pin 8 - orange (central bump switch)
pin 10 - white (cutting motor relay trigger)
pin 12 - red (left touch switch)
pin 13 - green (right touch switch)

Battery Charging
Although I have built in a charging socket, to date I have been pulling the batteries out to recharge them in my NiMH charger. The reason for this is that there are 12 batteries in series within the mower which means about 17v when fully charged and I don't have a charger that can do that.
I've always quite liked trickle-charging as it means you can leave the batteries connected and be sure they are always fully topped up for when you need them. NiMH batteries lose their charge if left unused, so topping them up is a useful feature. A trickle-charger for a lead acid battery is simple as the battery regulates the charge. For NiMH, you need a constant current source so it is a little more complex and it is recommended that you don't trickle charge them in some texts.
Some more research reveals you can indeed trickle charge NiMH cells, provided the charge current is kept below C/40 where C is the AH rating of the battery. I have 2900mAH batteries which means 2900/40 which is about 70mA max. So it might take a few days to recharge them but its not as though Lawna needs to be out every day. Once or twice a week is ample.
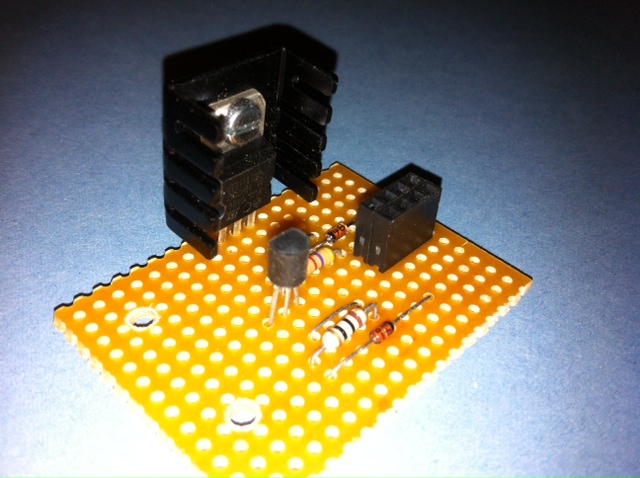
I put together a simple trickle NiMH trickle charger from components in my junk tin which gives a 60mA charge by charging all the cells in series. The power source is a 20V dc small power brick rescued from some broken led christmas lights. I'll get around to putting it in a box later but this means I can at least recharge the mower now without taking the batteries out.
August 2013
| Home | Contents | Start | Prev | 1 | 2 | 3 | 4 | 5 | 6 | 7 | 8 | 9 | Next |